


How do you photograph the Aurora Borealis? Today I want to answer one of the questions I’m constantly asked, giving you all the necessary information step by step.
Photographing the Northern Lights is not as difficult as it may seem but requires a good Northern Lights of photography, especially Northern Lights, the equipment you have, and other small things that I will explain as you go along this little guide, full of tips even for those less experienced.
HOW TO PHOTOGRAPH AURORA BOREALIS – INDEX
Equipment needed to photograph the Aurora Borealis
Before going out to photograph the Aurora Borealis: weather and solar activity
Thermal clothing for photographing the Aurora Borealis
How to photograph the Northern Lights: focus settings, ISO, aperture and shutter speed
Battery life and practical advice
Where to photograph the Aurora Borealis
When to observe the Aurora Borealis
Before returning home: watch out for condensation!
Equipment needed to photograph the Aurora Borealis
How to photograph the Aurora Borealis in the best way? Night photography is one of the most difficult techniques to learn, especially for photographing the Green Lady, and it takes a minimum of knowledge of the basics of photography and its equipment. Surely, in addition to the technical settings that I will explain gradually, good photographic equipment makes the difference. Do not save money on the SLR, but above all do not spare on the lens!

Below you will find the equipment needed to photograph the Aurora Borealis:
- A good tripod, sufficiently stable in the event of strong winds. Take care to grab the tripod with your bare hands: being exposed to very low temperatures if the tripod is made of aluminum you risk getting attached to the skin.
- Remote shooting, to avoid even the smallest vibrations.
- Reflex, or camera of good quality, and that holds good high ISO.
- Bright wide-angle lens, f1.4, f1.8, or f2.8 are ideal.
- Spare batteries: in the cold, SLRs consume much more than ‘normal’ temperatures. Better to have a couple more than to risk not being able to take pictures! I would recommend you to keep warm in an inside pocket of the jacket.
- SLR case or ‘plastic bag’: used to protect the camera in case of rain or sleet.
- Thermal clothing suitable for even very low temperatures.
- Normal torch and frontal torch, in order to illuminate the path to follow, to help you set up the SLR and make the light painting. The frontal torch must have both white and red light, which is essential for not disturbing your eye once you are used to the dark.
Before going out to photograph the Aurora Borealis: weather and solar activity
Before going out to photograph the Aurora Borealis I advise you to look at the weather: you need a completely dark sky (better without moon, although sometimes its presence helps to illuminate the landscape around and take spectacular pictures), serene and far from the light pollution of the city. In the inland areas, it will be easier to find a cloudless sky than the coastal areas because the latter are wetlands with unstable and often cloudy weather. It is also true, however, that on the coast the weather changes within 5 minutes, as happens in the Lofoten and Vesteralen, so if you want to photograph the Aurora Borealis on the sea, bring your patience and do not give up!
For weather forecasts, if you are in Lapland consult this website of the Meteorologisk Norwegian Institute, it is as precise as a Swiss watch and if it indicates a clear sky for example a couple of hours, be sure that in two hours it will be clear!
If you are in Iceland, see the verdur.is website, in the cloud coverage section. The white indicates the serene areas and the green indicates the areas covered, which vary in intensity depending on the gradation of the green.
Little hint: you do not have to look north! If you are inside the famous oval of Aurora, it can manifest itself everywhere. If instead, you are at Svalbard, you will have to look to the South!
Another factor to consider when photographing the Aurora Borealis is solar activity. Monitoring the solar activity and seeing whether or not there is an aurora that night is essential to save a voyage. There are two factors to consider: the Kp (K planetary) index which indicates its intensity and the G index (geomagnetic storm). Solar activity is measured on a scale from Kp0 to Kp9.
At low level (0-1) the Aurora Borealis is not visible to the naked eye, but taking some photos in the sky will probably be ‘captured’ by the SLR, while at level 3-4 you will have an Aurora already quite bright and strong. The higher the Kp index, the more the Aurora will be strong and intense and will, therefore, be visible even in the most southern areas.
When the Aurora Borealis reaches an intensity between Kp5 and Kp9, the index G is also taken into consideration, which is measured on a scale ranging from 1 to 5.
When the intensity of the Northern Lights is, for example, at Kp5, there will be a level 1 geomagnetic storm (G1) and so on. When solar activity is at its best, with a good deal of luck, you can see the northern crown. The Aurora literally explodes to form a circle at the zenith and moves very fast.
For the forecasts of the Aurora Borealis you can rely on different sites, but keep in mind that the forecasts are not 100% accurate and the best method to find out if the evening will be good to photograph the Aurora Borealis is always to go out and stay with your nose up! I would recommend the following: the NOAA forecast at 30 minutes or 45 days if you want to get an idea for a future trip, Aurora Forecast for Europe and the Geophysical Institute of Alaska Fairbank for Alaska or for Europe. For Finland, I suggest you the Forecasting the Northern Lights site managed by the Sodankylä Geophysical Observatory.
Thermal clothing for photographing the Aurora Borealis
Another important topic to talk about before taking technical settings on how to photograph Aurora Borealis is suitable for technical clothing. To photograph the Aurora Borealis you will have to spend many hours out in the cold, if not all night, and at night the temperatures, fall far below freezing.
As always, my advice is to dress in layers, starting from the first layer in contact with the skin that is the most important and is composed of excellent thermal underwear resistant to arctic temperatures or good underwear in pure wool. The second layer consists of a heavy wool sweater or a heavy pile, while the outer layer is formed by a heavy ski suit, always windproof and waterproof.
Ski boots are important for keeping your feet warm and it is important to choose them with great care. Scarf, hat, socks all completely in wool are other important elements to keep warm all the parts of the body more sensitive to the cold. For the hands, I recommend the good under gloves in Goretex and heavy ski gloves to be used to warm your hands during night outings to photograph the Aurora Borealis.
How to photograph the Aurora Borealis: technical settings
Before giving you the most important information on how to photograph the Aurora Borealis, I give you some advice to put into practice before leaving home to go hunting for the Green Lady. I advise you to fix some important camera settings: this will save you precious time if the Green Goddess will surprise you. We start by setting the shooting format to be in RAW, this will allow you to have shots with more quality and more details, which is very important to be able to work better in post-production.
Another setting to be set is the white balance: if you are at the beginning, we advise you to leave it on AWB (automatic) and let the camera choose the best balance according to the various situations. The best thing would be to change the kelvin manually depending on the situation, the light sources present in the frame of the image (Moon, lighted houses, street lamps, etc) and the amount of light present, but this would result in a loss of time not indifferent, especially if you are a beginner. Do not worry, however, if the balance will not be perfect because you will be able to arrange the white balance even in post-production.
After setting the first settings, making sure the sky is clear and having moved from the city light, the first important thing to do is to find a good place to photograph the Aurora Borealis: remember that the eye also wants its part and, in addition to the correct settings, you must also build a correct framing. Find a subject to put in the foreground, a stream, a frozen pond, or whatever you like and that can be the setting for the Aurora Borealis.
The second essential thing to do is to adjust the focus, which I recommend to do on the infinite. To do this it is necessary to manually focus on a very distant light dot that maybe the moon, a street lamp, or a star brighter than the others. If your camera supports it, you can help yourself by using the live view that will allow you to zoom and have more precision. Once the dot becomes accurate and well defined, lock the focus.

It is important to pay attention to the movements: a sudden movement could send the lens out of focus and throw away many shots. Once you find your infinity you can mark it with an indelible marker directly on your lens or you can block it using adhesive tape. Many lenses have the infinity symbol on the focus grid, but be careful because it hardly ever corresponds exactly to the indicated cleat. You have to do some proof.
Once you have placed your camera on the stand, check on your lens if the image stabilizer is present and if so, turn it off. Many SLRs have a built-in stabilizer, in which case this too is deactivated. Activate on your SLR the option for remote shooting, which can be a wired or infrared remote control, or via a mobile phone application.
Now that everything is positioned correctly, you are ready to go to the most important information on how to photograph the Aurora Borealis: focal aperture, shutter speed, and ISO.
Set the focal aperture to the lowest value of your lens, remember that good wide-angle light is ideal for photographing the Aurora Borealis. I recommend a lens with a focal aperture of at least 2.8 but do not despair, even with a 3.5 (focal opening of most of the basic objectives) you will be able to bring home some shots done well.
At this point, there are only two basic parameters to be set: shutter speed and ISO. How to photograph the Aurora Borealis? There are two ways to do this:
Long time, between 15 and 20 seconds and low ISO, between 800 and 1,000, to capture the movement of the Aurora and have the bright green ‘brushstroke’ effect in the sky. I recommend this setting if the aurora is not particularly intense.

Short times, between 6 and 8 seconds and high ISO, between 2,500 and 3,200 (check before your SLR regulates the ISO so high), to capture the real shape of the Aurora and its rays. I recommend this setting if the aurora is very strong and moves quickly in the sky
Never exceed the 25 seconds of shooting: beyond this limit, at first impact, the stars will be moved and not perfectly in focus. In reality, they are not moves but the camera has caught the movement caused by the rotation of the earth, making them small lines in the sky.
Warning: if you take pictures with the presence of the Moon, the parameters shown above are significantly reduced in half. Keep in mind that the light of the Moon greatly influences the lighting of the surrounding landscape, allowing you to get shots with the well-lit landscape without having to resort to light painting or bracketing, but tends to overexpose the part of the sky, as well as reducing the intensity of the Aurora. I recommend shooting around 2-3 seconds at ISO 800 and f2.8 (or the lowest value of your lens).
Before taking the final photos you need to do some testing and test that everything is set correctly. Obviously, the above parameters are not ‘law’ and once you become familiar, you can indulge and create the shots that you like.
How to photograph the Aurora Borealis: battery life and practical advice
How long do the SLR batteries last when the temperatures are so low? This is one of the most frequently asked questions and is one of the sore points when traveling in the Arctic in winter!
The electronic equipment, when exposed to extreme temperatures both for short periods and for whole days, requires more energy to be able to work properly reducing drastically the battery life.
The first advice I want to give you, the most obvious, is to leave with enough spare batteries. Another piece of advice I want to give you is to buy original batteries as they last a lot longer than non-original ones.
To protect your photographic equipment I suggest you wrap it in a towel when it is stored in your backpack while you are on the move and keep it warm inside the ski suit between a photo session and another. The towel is used to protect it as much as possible from possible freezing and consequent condensation. The same goes for the batteries: keep warm in an inside pocket of your ski jacket or pants and pull them out only when you really need them.

Where to photograph the Aurora Borealis
After learning how to photograph the Aurora Borealis, it is time to find out where to photograph it!
To see the Aurora Borealis go north, better beyond the Arctic Circle, and you can admire it in Canada, Alaska, Greenland, Lapland (Swedish, Norwegian, Finnish, and Russian), Svalbard, Iceland, the Faroe Islands and in Russia.
To photograph the Aurora Austral instead you have to go to the south, better than the Antarctic Polar Circle, and not surprisingly it is the most difficult to observe! It can be seen in Antarctica, New Zealand, Tasmania, and South Georgia.
The Aurora creates, around the magnetic poles of the two hemispheres, the so-called auroral oval that determines the area in which the phenomena can be observed more frequently and with greater intensity. It varies with solar activity: when the latter increases, the oval widens towards the southernmost areas, making it visible, for example, throughout Scandinavia. So the more North thought I go, the more chance I have of seeing it is not entirely true.
When to observe the Aurora Borealis
The Aurora Borealis is a natural phenomenon that occurs throughout the year, but during the summer months, it is not possible to observe it because, at these latitudes, the hours of darkness are few or even non-existent during the midnight sun.
The period to observe and photograph the Aurora Borealis is therefore included between autumn and winter, from September to early April, but being a natural and unpredictable phenomenon it is possible that, as in recent years, it is already visible towards the end of August, especially in Iceland.

Before returning home: watch out for condensation!
It is very important to pay attention to temperature changes. The sudden rush from cold to hot and vice versa will form condensation both inside the camera and in the lens and this could prevent you from taking pictures for hours or even days. To prevent this from happening, simply acclimatize the camera a bit, so when you go out for your photo session, wait a while before removing it from your backpack and, when you’re done, close both the SLR and the lens in their proper backpack before getting in the car or entering a warm place and try to keep it at a constant temperature. Avoid opening the backpack for at least an hour.
If the temperature difference is very high I advise you to store the camera in a plastic bag before returning to the hotel and allow it to acclimatize for a few minutes before removing it from the bag. In this way the condensation caused by temperature changes (hot / cold and vice versa) will form outside the bag, keeping your reflex perfectly dry.
It is also advisable to remove both memory cards and batteries before storing everything in the backpack or any plastic bag.
In the event that condensation occurs on the equipment, the best thing to do is to dry everything with a cloth several times, paying particular attention to the battery compartment, and not to remove the lens from the body otherwise condensation will also form inside the SLR.
How to photograph Aurora Borealis: curiosities and post-production
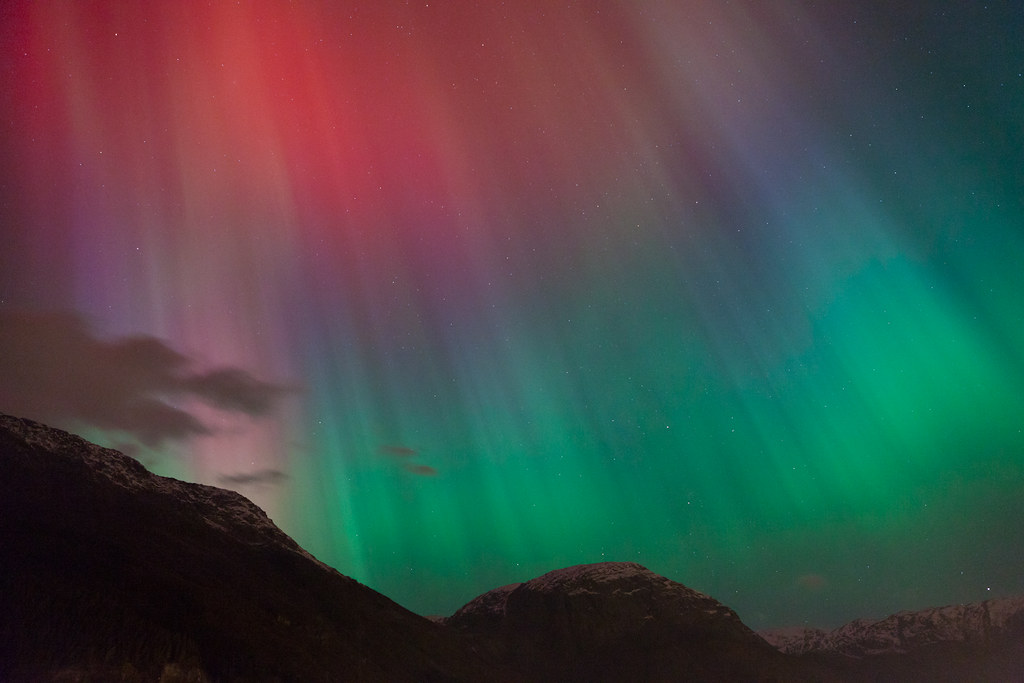
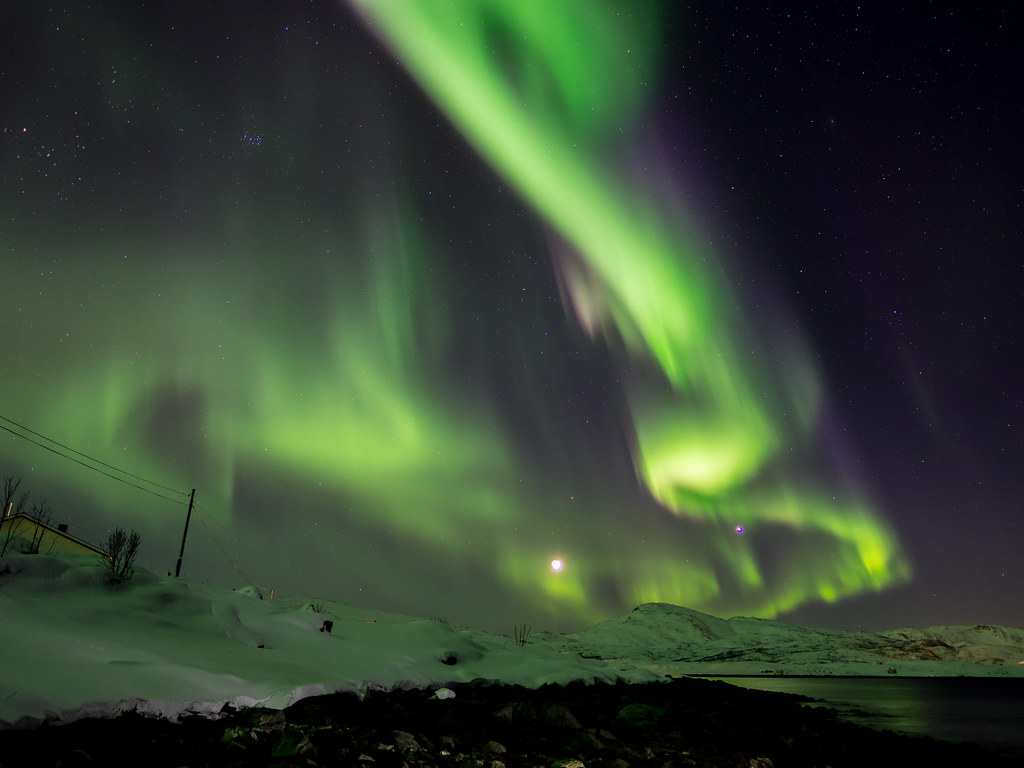
In addition to information on how to photograph the Aurora Borealis, it is necessary to know that the photos you find on the net obviously do not correspond to reality. The show that will be held above your head is not what you see in videos and photos online. You must know that if the activity is not high and the aurora is weak, you will probably see it white in color.
If, on the contrary, the activity is high and the aurora is strong, you will see it in a beautiful green color. If the aurora is very strong you will be able to see also the purple, blue and even pink colors! The latter is quite difficult to see because the aurora must be really strong to make it become pink. The rarest aurora to see is the red one.
Needless to say, once you get back home some tweak with Adobe Lightroom © or Photoshop © you must do it!
Once you have taken some pictures, throw yourself on the ground with your partner, and enjoy the show over your eyes.
The best photographs are those taken with the eyes and that remain impressed in the memory and in the heart forever!


